Split Tunneling is a networking concept which allows the user to access the corporate private network via the VPN link, and connect to the local LAN via the same or different interface. This service is usually facilitated through a program such as VPN client software application. One such application is the Juniper Network Connect.
Juniper VPN solution is also used at my workplace for secure remote access. The bad thing is that the Split Tunneling option is turned off by the administrator. With Split Tunneling turned off, the local LAN cannot be accessed during an active VPN session.
In the course of my work, I am often required to work on equipment located at our customer premises. As such, whenever I am on site, I always find it easier to connect to my company’s corporate network via VPN and at the same time, work on our customer equipment by connecting to their LAN switches. In this way, I am able to work on the equipment, check on my company’s knowledge base site for solutions, and respond to important emails, all at the same time. This however requires that Split Tunneling feature to be enabled.
Fortunately though, there is a workaround for Split Tunneling for Juniper VPN solutions. Read on…
Juniper Network Connect and the Routing Table Updates
Once the client successfully establishes a VPN session, it will add a conflicting route for all the existing routes. The new routes will have the route metric (cost of destination) value set to 1. The old original routes will have a route metric value bigger than 1. This will cause all the traffic to pass through the VPN tunnel. A route monitor will then monitor the routes for any changes. If a manual routing change is detected, it will immediately terminate the VPN session.Bug in Juniper Network Connect VPN Client
Even though the route monitor process will monitor all the routes on the client PC, it will ignore route changes if the only change was the route’s metric. This bug is however fixed in Juniper Network Connect version 6.2R3-1 Build # 13687.
Workaround for Juniper Network Connect prior to version 6.2R3-1
To exploit the route metric bug, perform the following steps:
- Connect to LAN and configure the IP address and routes as required
- Connect to your corporate network using the Juniper Network Connect client
- Open a Command Prompt window with Administrator privileges
- Determine the Juniper Network Virtual Adapter Interface Index number
The Index number is 24 in this case.1234567C:\Windows\system32>route print -4===========================================================================Interface List24 ...xx xx xx xx xx xx ...... Juniper Network Connect Virtual Adapter9 ...xx xx xx xx xx xx ...... Intel(R) PRO/Wireless 3945ABG Network Connection8 ...xx xx xx xx xx xx ...... Broadcom NetXtreme Gigabit Ethernet===========================================================================
- Take a look at your routing table. It will have routes something like this:
12345678910C:\Windows\system32>route print -4...IPv4 Route Table===========================================================================Active Routes:Network Destination Netmask Gateway Interface Metric...192.168.1.0 255.255.255.0 On-link 192.168.1.13 281192.168.1.0 255.255.255.0 On-link x.x.x.x 1 => duplicate route pointing to VPN tunnel...
- Modify the 2nd route pointing to the VPN tunnel as follows:
12C:\Windows\system32>route change 192.168.1.0 mask 255.255.255.0 x.x.x.x metric 9000 if 24OK!
- You should be able to access the nodes on the 192.168.1.0/24 network now!
Workaround for Juniper Network Connect from version 6.2R3-1
As the bug is fixed from version 6.2 onwards, the Juniper Network Connect Service (note that this is not the client) needs to be downgraded or patched to allow route metric changes to be performed.
If you take a look at your Windows Services, you will find a service called Juniper Network Connect Service that will be installed together with the Juniper Network Connect client application.
To use the route metric workaround, the executable for the Windows Service has to be downgraded to a version prior to 6.2R3-1. The route metric workaround was still working when I tested with Juniper Network Connect client version 6.3.0 and Juniper Network Connect Service 5.5.0. Your mileage may vary.
If you are more adventurous, you can instead try to patch the Juniper Network Connect Service executable to make it assume that there are no routes to monitor. You may require a tool similar to the IDA Pro Disassembler to assist you in patching the executable.
Tips on patching the Juniper Network Connect Service
This tip is based on the version 6.3.0. It might differ for other versions.
- Generate assembly code for the executable using IDA Pro
- Search for a
pushinstruction that references the stringno routes to monitorand determine the function name - Look for a conditional jump instruction before that instruction. This instruction has to be patched with the famous
nop(No Operation) instruction or0x90 - Locate the function in IDA Pro and determine the hexadecimal data surrounding the jump instruction
- Open the executable in a Hex Editor and search for the hexadecimal data and patch the jump instruction to 0x90
The service should now assume that there are no routes to monitor. As the program flow could change in the future, please only use the above guide as a general reference.
If you are using the VPN client on Linux or Mac OS, IDA Pro might still be useful to you.
Workaround for Juniper Network Connect version 6.4 and 6.5
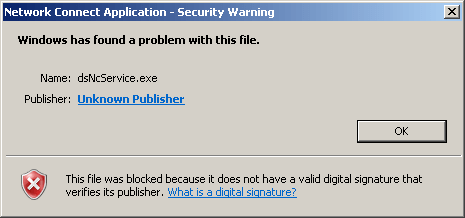
I got a couple of mails requesting for help to get version 6.4 and 6.5 working, therefore I am adding this section. From version 6.4, Juniper has started using digital signatures for the Network Connect Service. Once the file is patched, you will get an invalid signature error.
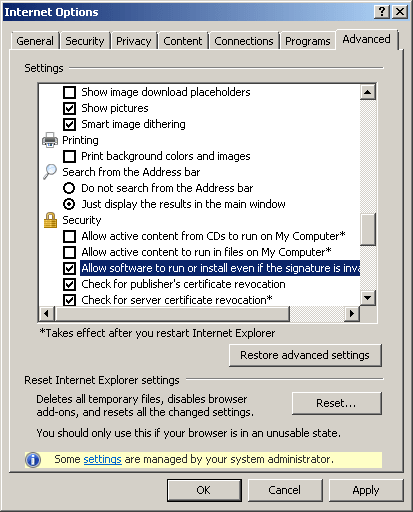
To overcome that error, open IE and goto Tools -> Internet Options, and click on the Advanced tab. Enable the option that says Allow software to run or install even if the signature is invalid.
There are also some routing table changes from version 6.4 onwards, which makes the routing changes a bit more harder (Juniper removes the directly connected routes). You can either opt to patch the Network Connect Service version 6.4 or 6.5 or you could just simply downgrade the Network Connect Service to version 6.3 instead. Downgrading to version 6.3 will get you back the route modification flexibility.
Update (2-Mar-2011): Added workarounds for Juniper VPN 6.4 and 6.5
Update (22-Sept-2013): You can refer to the article Juniper VPN Network Connect Split Tunneling Patch for the patch offsets.
Related: Workaround: Juniper Junos Pulse Split Tunneling Restriction
DISCLAIMER: THE ABOVE ARTICLE IS MEANT FOR EDUCATIONAL PURPOSES ONLY. I DO NOT PROMOTE OR SUPPORT ANY KIND OF REVERSE ENGINEERING OF COPYRIGHTED MATERIAL OR CONTENTS. THIS IS JUST A PROOF OF CONCEPT AND I AM NOT RESPONSIBLE FOR ANY LEGAL ISSUES YOU ENCOUNTER IF YOU FOLLOW THE ABOVE GUIDES/INSTRUCTIONS. I AM NOT RESPONSIBLE OF ANY OUTCOME, LOSS OF DATA OR ANY DAMAGES RESULTED DUE TO THE ACT OF YOU PROCEEDING WITH THE ABOVE GUIDES/INSTRUCTIONS.
Mohamed Ibrahim
ibrahim = { interested_in(unix, linux, android, open_source, reverse_engineering); coding(c, shell, php, python, java, javascript, nodejs, react); plays_on(xbox, ps4); linux_desktop_user(true); }
